
|
|
|
#1
 05-14-2010, 02:02 PM
|
||||
|
||||
|
Sparton Junior restoration
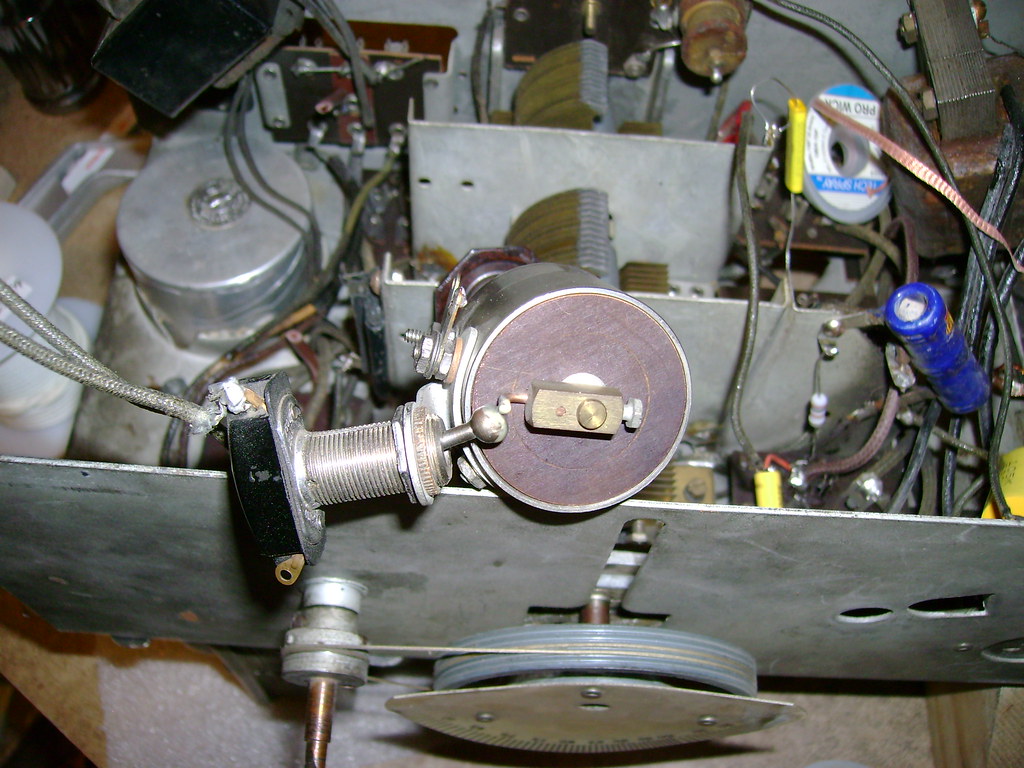
I picked this radio up a few months ago from a local antiques shop. Right away I noticed the switch sticking out the side and the 183 output tubes were missing.
I pointed this out, negotiated a better price and took it home   It's in pretty good shape overall. Just a little separation of the cabinet and some corrosion on the chassis. Underneath, there's evidence of some old repairs.   It's fused and supports multiple line voltages.  First up, I tacked some new caps in place just to try it out. I don't have a pair of 183s, but thanks to other forum members I was able to sub in some 71As Notice the metal bracket coming off the volume control ? That's where the power switch would normally be located. Someone had removed it, drilled a hole in the side of the cabinet and remounted it there. More on that later.  I powered it up with a variac and dim bulb. No smoke so I increased the voltage until the filaments were glowing nicely and I had reasonable B+. Nothing but static out of the speaker though. I touched the grid caps on the 224s and got a hum at the 2nd stage, but nothing form the first. A little investigating turned up an open coil   Luckily, the break was just at the end and I was able to repair it. It's alive  

|
|
#2
05-14-2010, 02:22 PM
|
||||
|
||||
|
Now to restuff those old caps. I clean out the little metal box, stuffed 4 new 0.033 uF caps inside and filled it with wax. A power resistor gave out and I had to use a modern looking one.
 That left the big filter cap. Sparton mounted it by punching a hole in the chassis with bent over flaps and shoved the soft aluminum can in. I've had to deal with this once before. They are a bitch to get out.  Finally I managed it and was treated to a nice label which had been hidden before - 16 whole microfarads   Now, I can cut off the bottom and restuff it.   I used a little JB Weld to reseal the can.  That leaves the scratchy volume control. I carefully unsoldered it and popped it open. I was quite surprised at what I found inside. That is one sweet potentiometer  I used a little deoxit and no more scratchies.  
Last edited by bandersen; 05-16-2010 at 04:32 AM.
|
|
#3
05-14-2010, 02:32 PM
|
||||
|
||||
|
Next, I polished up the chassis. First a little naval jelly, then Noxon metal polish and finally some simichrome polish.
   Finally, I determined that the power transformer and shields were originally painted silver/grey. I chose to use some Rustoleum specialty metallic silver. I left the transformer soldered in - just removed the bolts and slipped some paper in to protect the rest of the set.    I still need to track down one of the missing tube shields. Here it is with the one good 183 tube I do have. I'm tempted to sell it rather than find a twin. They are quite expensive. Besides it has more than enough volume with the 71As. Last edited by bandersen; 05-16-2010 at 04:33 AM.
|
|
#4
05-14-2010, 02:51 PM
|
||||
|
||||
|
Now back to that power switch and the hole in the side of the cabinet. After a bit of detective work and tinkering, I was able to remount the power switch on the volume pot and make it work - most of the time. Every 50 or so flicks the little wire stub wouldn't flick the switch over. When this happens, the only way to fix it is to remove the chassis and manually flip the switch. I suspect this is why someone relocated it to the side of the cabinet.
   I've gone back and forth over what to do about it. Currently, I'm going to leave it mounted in the side. I'm not going to refnish the cabinet and any patch job I do is going to be very visible and I'm not crazy about having to pull the chassis next time it gets stuck.
|
|
#6
05-14-2010, 03:20 PM
|
||||
|
||||
|
This switch requires a lot of force to flip. The little "L" wire is adjustable in and out. The problem seems to be that if I extend the trip wire too much, it won't make it past the switch ball. If it's in too far, it will slip past without tripping the switch. If I could locate a power switch that requires less force, I bet it would work a lot better.
Of course, I could replace the whole assembly with a more modern combo pot + switch, but where's the fun in that I wonder how other manufacturers managed it  The other late 20's - early 30s radios I've seen have dedicated power switches. The other late 20's - early 30s radios I've seen have dedicated power switches.
Last edited by bandersen; 05-14-2010 at 03:23 PM.
|
|
#7
05-14-2010, 04:33 PM
|
||||
|
||||
|
As for the cabinet, I only used Howard's Restore-A-Finish walnut, Feed-N-Wax and a whole lot of elbow grease.
It does a great job on blemishes and scratches. With a little steel wool and rubbing it smooths out alligatoring too.  Before  After  I also replaced a couple missing braces and tightened up some loose joints.   Here it is ready for the chassis. I really like that patina. 
Last edited by bandersen; 05-15-2010 at 12:04 AM.
|
|
#8
05-14-2010, 08:42 PM
|
||||
|
||||
|
I think is the way the repwood grill is supposed to go

|
|
#9
05-16-2010, 12:22 PM
|
||||
|
||||
|
Nice job on that set. I have one I got about 20 years ago. The are realty great performers kind of a mix of 20s t r f meets 30s ac. Allways wondered what that big empty hole in my chassis was for.does anyone have a spare lyric to fill in that hole?
__________________
RCA VICTOR and its dealers bring you......
|
|
#10
05-16-2010, 02:58 PM
|
||||
|
||||
|
I wonder if the switch would work better if you bent that metal tip just a further outward so it makes better contact with the switch ball?
__________________
Growing up leads to growing old and then to dying, And dying to me dont sound like all that much fun... -John Mellencamp
|
| Audiokarma |
|
#11
05-17-2010, 10:35 AM
|
||||
|
||||
|
I like what you're doing with this set, preserving as much as possible the original finish.
A lot of early sets had a power toggle switch on the side so this one doesn't really look out of place. That switch has a long threaded shank which is used for just such a purpose, going through thick wood. Why would they use such a long shank if it were to be mounted on the volume control? Is there evidence that a switch ever was originally mounted there? Or did someone substitute the long shank switch? The wiring might give a clue. That being said, you could try a modern short shank toggle on the pot; should have less force required. Maybe a ready-made wooden button plug properly finished wouldn't look too awful stuck in the switch hole? BTW, that pot was designed by an engineer the week that the bean counters were on vacation. Built to last!
__________________
Reece Perfection is hard to reach with a screwdriver.
|
|
#12
05-17-2010, 01:54 PM
|
||||
|
||||
|
Quote:
That being said, the mounting ring on my control sure looked virgin. No scuff marks at all. The wires look original and are long enough to mount the switch in either position. I thought about plugging the hole with something like that. It's a little jagged around the hole, but I suppose some filler could take care of that. LOL - I was reluctant to seal that pot back up and hide it away. It should be out on display.
|
|
#13
05-17-2010, 02:26 PM
|
||||
|
||||
|
I wonder if the switch mounted on the side was factory. Maybe they found that positioned on the volume control it wasn't reliable causing callbacks and so went to the side mount in later production.
__________________
Reece Perfection is hard to reach with a screwdriver.
|
|
#14
05-18-2010, 09:05 PM
|
||||
|
||||
|
That restoration job really looks nice! On mine, yes there is a toggle switch mounted on the volume control for the on/off function.
|
|
#15
04-22-2011, 05:13 PM
|
||||
|
||||
|
I'd been holding off on finishing this project lo these many months in the hopes of finding a matching 483 output tube. It doesn't seem like that's ever going to happen - at least not one I can afford. I never found a tube shield either. Ah well.
So, I left it modified for the 71As, installed a new power cord and buttoned the set up.  
|
| Audiokarma |
 |
|
|


 Linear Mode

